Pages

Showing posts with label machine quilting. Show all posts

Wednesday, August 20, 2014

Row by Row

Almost finished!!  I finally sat down a few days ago and quilted my row from Artistic Artifacts. 


The binding is attached and half-way stitched down on the back, but here you can see what it will look like when finished.

Thursday, July 10, 2014

QC6 Day 11

Today was a wash out - wash out of dye, that is.  I had 3 things batching over night that I showed you yesterday - the shibori pole wrap, clamped piece and napkins.  The napkins weren't as dark red as I wanted so after rinsing I put them back in soda ash and then back in the dye pot with some additional dye.  The pole wrap looks much better now - more balanced, and the clamped piece (circles) is interesting.

I finished my "row" from Keepsake Quilting's pattern.  The pattern is only 4 blocks; I added a third Yankee Puzzle block because I felt it looked more balanced, and plan to use it as a table runner instead of part of a quilt, so length doesn't matter.
I was going to layer my Artistic Artifacts row for quilting, but decided I wanted to add a border to make it a little wider.  Since I didn't have a piece I felt worked, I decided to print my own.  I had a piece of hand-dyed orange, and wanted to add texture and/or print.  I started by printing an all over design with discharge paste, which takes color out when heated with an iron. 
On the left I've applied the discharge and started to iron the bottom corner; on the right is what it looks like after ironing.  Then I went back to the print table and screened another image over top.  But I forgot to take a picture so I will share that tomorrow.

What else did I do today?  I made a peach pie; that's my assignment while I'm here - a pie a week!
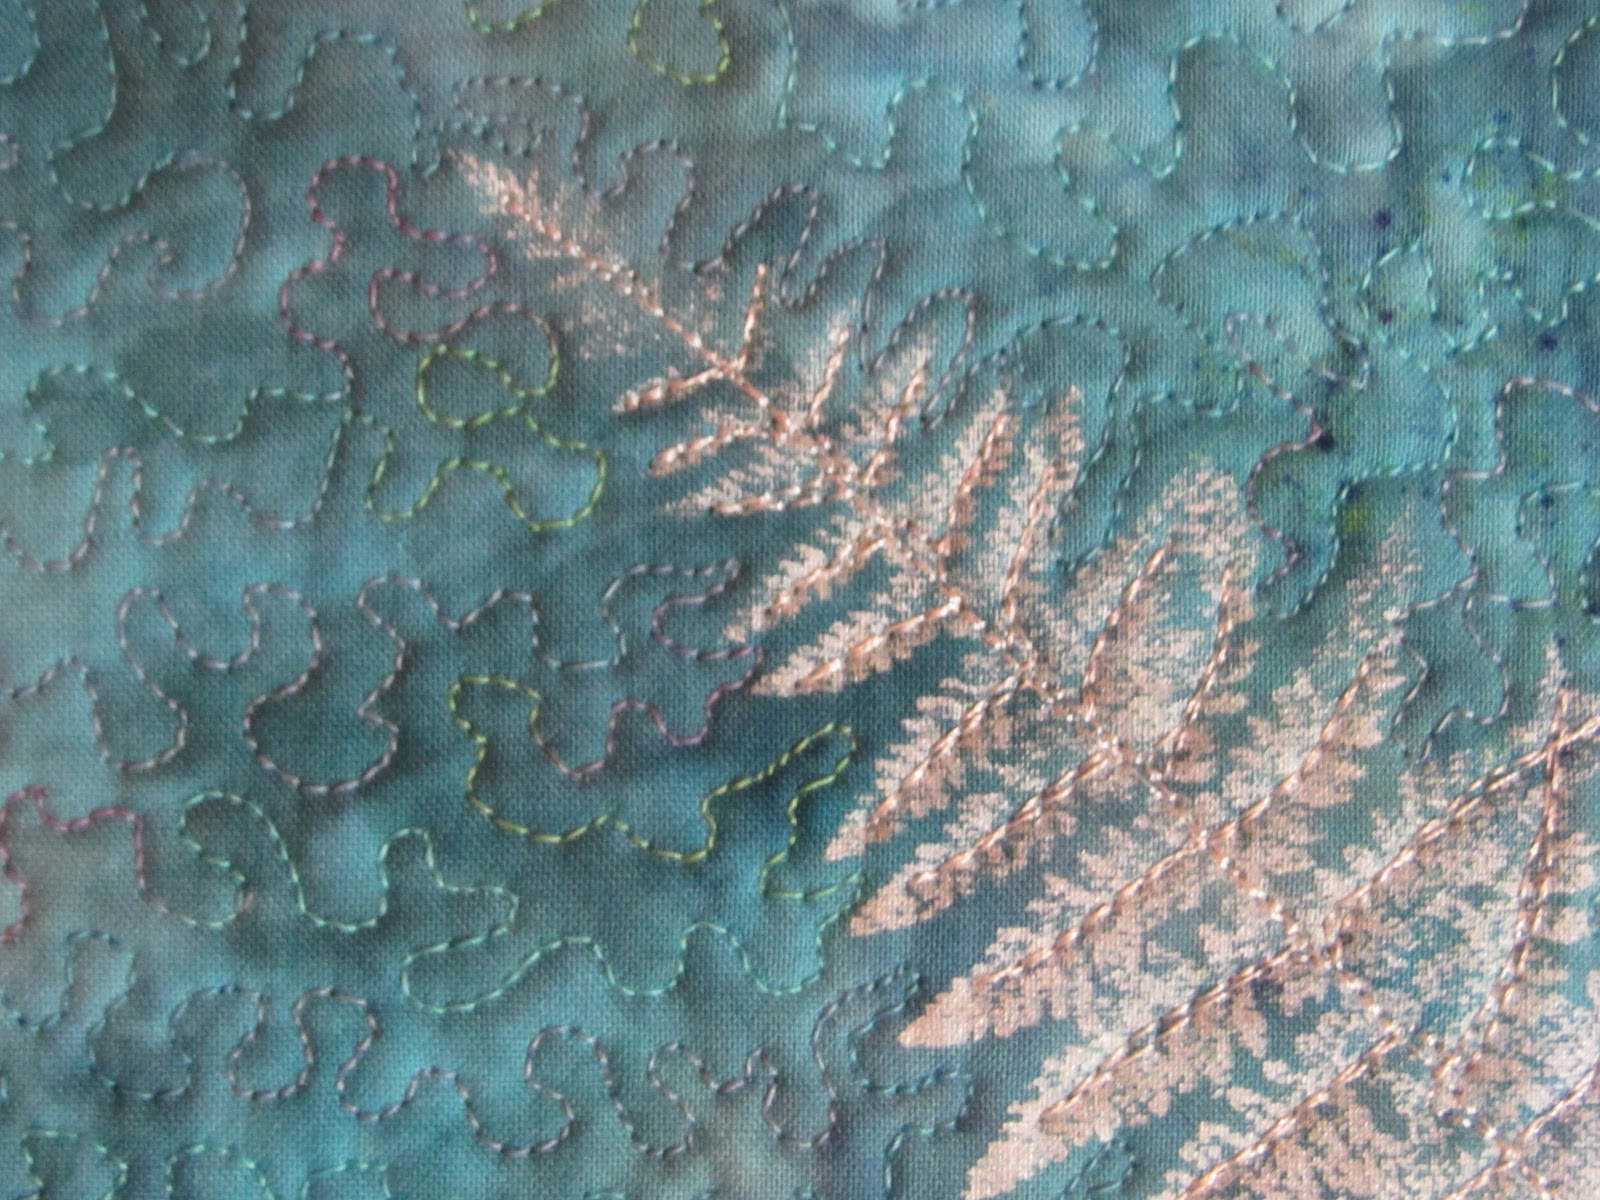
I put together a small collage in neutral colors and machine quilted it, then put it in a dye pot - the leftover cobalt blue.  The dye is not full strength, so I'm hoping it will turn out a paler color than the piece with circles above.  This is a process we saw on a Quilting Arts video called Quilting and Dyeing Serendipity.
And finally, a little bit of a sunset.

Tomorrow, another road trip!

Wednesday, February 19, 2014

Finished and Delivered!

I put the finishing touches on the commission quilt today and delivered it to the customer.   It doesn't look much different than previous posts, and it was hard to get the whole thing in a photo because of its double bed size, but here it is, finished.


You can see previous posts of the process of making this quilt here:
Cutting up the clothes
Assembling blocks
Getting ready to quilt
Beginning to quilt
Quilting Close-ups
Binding

Saturday, January 25, 2014

Quilting Winter Oaks

Since I was still in quilting mode and had some time today, I decided to get started with the quilting on this Winter Oaks piece that has been on the design wall since last summer.


The painted tyvec leaves like the one I'm stitching above were already stitched to the quilt top.  I am going over the previous stitching (through all the layers) with a different color that shows up better.  Some of the leaves are photo transfer, done with Transfer Artist Paper by Leslie Riley, and some are done with discharge medium through a thermofax screen.  These are supposed to be "ghost" leaves, the ones that are most decayed and are less visible except for the stitching that outlines them.


More to come later.  I'll be away for a week so will get back to this project when I return.

Friday, January 24, 2014

Quilting Done!

After 5 days of work the quilting on this project is finally finished.  Binding is attached and ready for hand stitching.


Sunday, January 19, 2014

Progress...continued.

I am finished with 3/4 of the quilting on this project.  Thank goodness!  One or 2 more sessions should do it.  Quilting the second direction is more challenging, since this dimension is longer and results in more overhang to the left and right of the machine.  I will be happy to be finished with the quilting.

Thursday, January 16, 2014

Progress!

After about 4 hours of quilting today, I am a quarter of the way finished quilting this project.  Yeah!  I thought it would take much longer.  I'm very happy to say that I figured out a way to maneuver a large quilt through my sit down HandiQuilter, and a way to keep the excess rolled up.  This is the first time I've done a quilt this large on the HQ (double size).


I purchased the black clamps above to use with Shibori dyeing, and the Clover jumbo clips without a particular purpose in mind.  My first thought was to use the Clover clips to keep the quilt rolled, but they were only big enough to hold the ends in place.  So then I went to the clamps from the hardware store - you never know what tools you'll need for quilting!  They were perfect to keep the rolled up fabric in place.
Then, knowing I needed more table space to support the excess quilt, I decided to move my domestic machine off its desk and clear the end of the cutting table next to the HQ.  Perfect!  That more than doubled the work space and made it much easier to move the quilt - very little wrestling required!
The stool also provides added support, and can move to either side, depending where the bulk of the fabric is.  So happy I figured this out!  I was thinking I needed a different configuration of my space to make the HQ more usable, but this is a much easier solution.
Above is the back side of what I did today.  Hard to see unless you click on the picture to enlarge it.  The wavy lines will go in both directions to create a plaid effect.


Wednesday, January 15, 2014

Getting Ready to Quilt

I have a commission quilt to finish, which I've shown parts of last fall.  It is layered with backing and batting and pin basted, and ready for quilting.  I've been pondering how to quilt it and have come up with a plan so its time to start. 

This is a double bed size quilt, and its been a while since I've quilted anything this big.  Or used my HandiQuilter.  So I did some practice to get warmed up and try out my plan for stitching.

  The wavy blue lines are my practice, kind of a plaid effect.  I'll get started on it tomorrow.

Saturday, July 6, 2013

Passages - I Can Fly

Quilting Arts magazine recently had a reader's challenge to submit a 10 x 10 quilt based on the theme "Passages".  Since my submission was not selected  - they chose 12 out of 125 - I guess I can share it here.  Those odds are pretty low, so I don't feel too bad about not being chosen; I'm happy with how it turned out, regardless.  My quilt is a reflective piece about my daughter moving away from home to become an independent adult. When she was growing up, she used to say, "Guess what?" and I'd say, "What?"  Her reply would be "I can fly!"  I have no idea where that came from.  But thinking about this passage brought the memory back.  The text is done with thermofax screens of notes she wrote while away at college.  The bird and wings imagery complete the idea of nurturing a child until they are ready to fly on their own.  I look forward to seeing the challenge finalists' quilts in the October/November issue of Quilting Arts..


This piece is made on rusted cotton fabric with gelatin plate printing in the background, thermofax screen printing, Transfer Artist Paper (original photograph of robin and babies), and is machine quilted.

Sunday, February 17, 2013

Back View

Here's a picture of the back of Song Sung Blue that shows the quilting. 

 Of course I forgot to take a show that included the facing.  Guess that will be another day.

Sunday, February 10, 2013

Song Sung Blue Finished!

In the 2 weeks since my last post, I've finished SSB - it's for a challenge that is to be unveiled at my guild meeting this Wednesday, so finished with time to spare.  Rather than borders or binding, it is finished with an artist;s facing.  I didn't have any leftover of the hand-dyed fabric I started with, and the pieces I auditioned for binding didn't enhance the piece, so just finishing off the edges seemed the best bet.  I haven't taken any pictures of the back - sounds like a good idea for tomorrow.


I'm happy with the way it turned out. 

Tuesday, January 22, 2013

Quilting Blue Song

I've been working on the quilting for 2 days - first the blue flowers, then the sky, and finally the stems and leaves.  The colors blend in pretty well, so it's not super visible, just gives it some definition.  I still have the grass and butterflies to do.


Monday, October 8, 2012

Quick Project

Today I finished a quick project, a fall table runner from a Quilting Daily email. It's made from 5" squares and goes together very quickly. Straight line machine quilting and a folded over backing to bind the edges made for an easy finish. It looks good with my felted pumpkins and acorns!

Saturday, September 29, 2012

AAQI Quilt Goes to Houston

Recently I was checking to see if my AAQI (Alzheimer Art Quilt Initiative) donation had sold.  It has not, but I found that it is one of a very large group going to Houston to the International Quilt Festival, where they will be for sale at the AAQI booth from Oct. 31 - Nov. 4. Houston is the biggest show in the US; I've never been to see it, so my quilt will get there before I do. You can see it's page here: use the bread crumb trail at the top to go to Houston 2012 and see more of the quilts going to the big show.

Sunday, August 12, 2012

Nickel Tote

Saturday was our August VCQ meeting held in Waynesboro, VA.  We had an enthusiastic group of ladies who participated in 4 classes and Come Quilt With Me.  I was in the Nickel Tote class, making a bag/tote/purse out of 5" charm squares.  With some pre-cutting of lining pieces and fusible fleece, we were able to get the various parts constructed, and I finished putting it together this afternoon.  One speedy classmate was able to get her's completely assembled in class.  Here are shots of the front and back of mine, made with batiks. Unfortunately, I was too busy sewing to think about taking pictures of others' projects!


The next meeting of Virginia Consortium of Quilters (VCQ) is November 10 in Martinsville, VA.  The night before (Friday, Nov. 9) will be the opening of a quilt show at the Piedmont Arts Center curated by Linda Fiedler.  This show has been held every 2 years for the last 10 years or so, and is always a highlight when we meet in Martinsville. Check out the VCQ website and our Facebook page.

Sunday, July 22, 2012

Arts & Old Lace Quilts Revealed

The Arts & Old Lace exhibit opened yesterday at Artistic Artifacts, so now I can share the 2 pieces I have in the collection of 80+ quilts.  It is a wonderful show, stop in to see it if you can; so many different interpretations of the theme.  Quilts will remain on display through the end of September during regular store hours, Tues & Thurs 11-5, and Sat 9-2.

I have been photographing architectural elements for the last year, so the theme brought to mind a quilt based on Architectural Lace. This piece was created with thermofax screens of architectural elements from various buildings - church windows, porch columns and the arched filligree of a Victorian porch.  The vertical lace inset was part of the kit, as were the other laces added as trim.  The screens are printed on a collaged batik background. The antique buttons were purchased at a quilt show.  Machine pieced and quilted.
My second interpretation of the theme is Nature's Lace, also created with thermofax screens. A lacy fern and of course Queen Anne's Lace, both open and closed, are the elements used here.  A circle of emboidered fabric included in the kit became the center of the fern "flower".  The butterflies are also printed from a thermofax screen onto a hand-dyed fabric, then cut out, fused and stitched in place.  The blue background is a snow-dyed fabric.  Machine quilted.


Sunday, June 17, 2012

Arts & Old Lace Sneak Peak

Arts & Old Lace is a quilt challenge put together by two local quilters, Judy Gula of Artistic Artifacts and Cyndi Souder of Moonlighting Quilts.  The challenge was simply to create an 18" quilt with this theme; a kit of fabrics and laces was provided, but not required to be used.  I made 2 pieces for the challenge which will debut July 21.  I won't show the completed pieces until after that date, but I thought I'd share a few close-up shots of what I've been working on for the last month.


  Need I mention that both pieces contain screen printing?  Visible in the first picture but not so much in the second.  Stay tuned for more pictures later.

Tuesday, May 1, 2012

Secret Projects Revealed

A few weeks ago I shared a sneak peak at some projects I was working on.  They were teacher gifts for our VCQ Celebration retreat weekend.  Since that weekend has just passed, I can show the whole pictures now. 
These are 'mug rugs", about 9 x 12.  My friend Elizabeth stitched the machine embroidered pineapples.  I added the strips and quilted the 9 mini quilts. This was good practice quilting on the new Baby Lock machine.  I also tried a fusible binding technique I learned from Cynthia St. Charles' blog,

This is one of the "Pockets to Go" from a Terry Atkinson pattern.  Three of us each made 3 of the cubes, which we filled with various treats for the teachers. Now I need to find time to make myself one!

It was a great weekend, wonderful classes and teachers, and lots of fun activities.  More later.. 

Friday, April 6, 2012

Secret Projects

I've been working hard to finish some gift items for a quilting retreat later this month.  While I can't share complete pictures of the projects, here's a sneak peak at what I've been working on.

Look forward to showing the whole thing in a few weeks!

Sunday, March 18, 2012

Playing with Baby

Today I finally took some time to play with my new Babylock.  I have a small quilt from a Karen Eckmeier workshop 2 years ago that needed to be finished.  It needed some more quilting and binding & sleeve added, so I pulled it off the design wall and got to work.  I wanted to get the binding on, but realized I hadn't quilted the border, so that was the first step. I learned how to wind the bobbin and set the machine up for free motion stitching.  After quilting the border, I went ahead and added the binding and a hanging sleeve.  Then I decided to add some more quilting to the landscape.  I have a bit more quilting to do and maybe some more embellishment, but it's closer to being done, AND I got to play with the machine!  Happy with my purchase so far - lots more to explore.