In my last post, I mentioned that I would show how I got from point A to point B of the piece I am calling Winter Oaks. It started as a workshop called Fractured View and looked like this.
 Rather than leave it like this, I decided it needed something more. It reminded me of bare winter trees, and I thought a brightly colored bird would serve as a focal point.

 I found an image of a cardinal that I drew to make a thermofax screen and printed it in black on a piece of red fabric. Then I added wonder under to the back before cutting it out so I could fuse it in place.
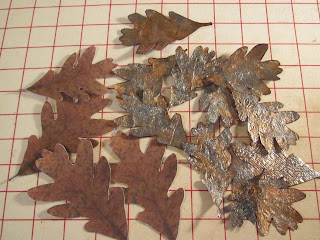 I also knew I wanted leaves. I took a piece of tyvek and painted it with browns, copper, and silver colors to resemble decaying leaves. Since I had a photo of an oak leaf that I used to make a thermofax screen, I traced the leaf to make a template to cut out the tyvek leaves. The cool thing about tyvek is that when you iron it (carefully) between layers of teflon pressing sheet, it shrinks and shrivels. The more heat you apply, the more it shrinks. So I made a bunch of tyvek leaves. Then, I was using some TAP (transfer artist paper) for another project, and realized I could make some leaf transfers as well. Those are the ones on the left. Now I needed some smaller branches to fill in a bit and provide a place for the bird to perch. I fused wonder under to some leftovers of the fabric, cut random lengths & widths and fused them in place.
 After placing the bird, I started playing with the leaves, ironing the transfers on first, then pinning the tyvek leaves. While the tyvek leaves were still pinned, I screen printed a few more (not visible in this picture) and also added a few with discharge paste through the screen. My intent is that the quilting will make those leaves visible. I layered the top with batting and stitched down the tyvek leaves.
 The backing has been added and is ready for quilting. More pictures later when it is finished!


No comments:
Post a Comment