Wednesday, April 24, 2013


Monday, April 22, 2013
Batik Day 2

This is another piece from day 1. After the first waxing it was dyed yellow. The white is the first waxing with tjaps. What remains yellow is the second waxing after which it was over-dyed red. I think this piece is successful; I really like it.


Tomorrow - pictures of classmates creations!
Sunday, April 21, 2013
Indonesian Batik Workshop
I was very fortunate this past week to be able to participate in a 2-day batik workshop at Artistic Artifacts with Indonesian batik artists Agus Ismoyo and Nia Fliam. They are in the US for the opening of an exhibit in which they are featured, Out of Southeast Asia, at the Textile Museum in Washington, DC. It was a very full 2 days, starting with learning about the ancient creative process of batik, symbols that form the basis for traditional designs, and getting in touch with our own creative source. We started by learning to create designs by hand with the tjanting tool seen here is 3 sizes.


 Ismoyo instructed us in the techniques for using tjaps. the copper tool used for stamping batik designs. The wax pan has a layered pad in the center (copper, wire screening, and several layers of fabric); the tjaps are placed around the outside of the pan to heat, and tapped on the center pad to coat it with wax that is then applied to the fabric. The fabric is placed on a foam pad that is saturated with cold water, so when the hot wax on the stamp is pressed into the pad, it immediately solidifies.


 After the wax is applied, its time for dyeing. They use napthol dyes which is a different process than we use in the US. There are different pre-soak base mixtures that determine the color resulting from the color solution. Its all very confusing! After dyeing and a 15 minute post-soak, it goes into boiling water to remove the wax and then a cold water rinse. The colors are rich and fabulous!


 Above are my first 2 pieces from Day 1. The red one is my "doodle" piece, learning to use the tjanting tool. The blue piece has a hand done border, with a stamped tjap design in the center. The blue piece was waxed again and over-dyed the 2nd day. More pictures tomorrow.


Friday, April 19, 2013
Tie-dye Reveal
Well, obviously I didn't get this post up on Wednesday as planned. If you've been checking back to see the T-shirts revealed, here they are - a sampling, anyway. Each one is a little different, but they're all cool!


Here's a portion of the team in their shirts - they won their first game! Yay!!
Tuesday, April 16, 2013
Team America Tie Dye!
My daughter plays on a kickball team in DC, calling themselves Team America. A while back, she mentioned that she wanted to tie dye their shirts. Well, last week we finally got down to some specifics, since the first game is coming up on Thursday. I haven't done much tie dyeing nor given this project much thought, and it suddenly dawned on me that she was talking about the shirts for the ENTIRE TEAM - 25! With the weekend already busy (teaching a class and attending a wedding), Sunday was the only time to get this done. We looked at some books for tying options (while riding to and from the wedding), and since she wanted red, white & blue, decided to try a spiral design. After arriving home from the wedding Sunday (an overnight trip), we went out shopping for the additional supplies needed. - who knew inexpensive kitty litter pans would be so hard to find? Then we finally got everything assembled and started tying the circular bundles with rubber bands. We used 3 bands on each to make 6 wedges, so we would have 2 wedges each of red, white and blue. After that, they went into a soda ash solution to soak for 20 minutes. My daughter's friend arrived to help, and later on, her sister and another friend. I mixed up the dye, and they did the application.


 We used cooling racks from the dollar store and foil grill pans to elevate the shirts off the bottom of the pans, so they wouldn't sit in the dye that dripped all the way through. Then they had to sit for 24 hours. Come back tomorrow for the results!


Monday, April 15, 2013
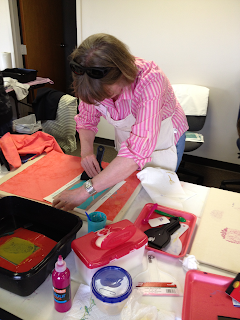
Thermofax Screen Printing Class
What a busy weekend! Along with my partner in crime Elizabeth, I taught a screen printing class on Saturday at Artistic Artifacts. I went to an evening wedding Saturday night, and arrived home Sunday to spend the day helping my daughter and her friends tie dye 26 shirts for their kickball team! More on that project to come; first, the printing class. We had a great group of 9 ladies coming to printing from a variety of perspectives. It's interesting to hear the various perspectives on their work that people bring to class. We had some who are into modern and art quilts, some who do mixed media, and even 1 who refurbishes furniture and wants to print her own fabric to make it unique. We even had the "Richmond 4" who traveled to Alexandria from Richmond for our class and am happy to report that they felt it was well worth the trip. They had free use of our screens for the duration of the class and got hands on practice learning the printing technique - and soon found out how fun and additive it can be. Its fun to share our love of printing with folks who are motivated to learn.


Subscribe to:
Posts (Atom)